Single Sign-On and Resource Separation on AWS
Introduction
Most AWS projects start small and simple, with just a single AWS account that contains all the resources and services to build, deploy, and run one or more software projects. Up to a certain point, this is just fine. And even with just one account, resources can be isolated from each other – for example, you can run the EC2 instances of your preproduction stage in a different VPC than the instances of your production stage.
But the best practices recommended by AWS suggest a more thorough isolation: Put everything that belongs together in one AWS account, and everything that doesn’t into another one. Thus, for example, one dedicated AWS account for preproduction, another one for production. This way, getting from resources/services within preproduction into resources within production, either by mistake or maliciously, becomes near-impossible.
Once you realize how an AWS account is simply a very-high-level namespace, the decision to create yet another account whenever it seems fit comes easily, and rightly so. Got 4 projects consisting of 3 stages each? Cut that into 12 AWS accounts, no need to be squeamish. You even get cleanly separated billing, and therefore precise per-project cost management, for free (while you can still receive just one consolidated invoice, if that’s what you prefer).
There is a downside to this approach, however: without a well-designed setup, access and rights management quickly becomes a mess: You certainly don’t want to use the “root” user of each AWS account to do stuff within each account, and might consider creating one personal IAM user for each of your team members within each AWS account, linking them to the least-privilege IAM policies that are necessary for their duties within each AWS account.
That’s a secure approach – but not one that can be easily managed, even by the users themselves, as every team member now has 12 IAM users.
Here is a better solution: Create exactly one IAM user for each team member, and enable these IAM users to switch into specific roles within each of your AWS accounts.
The example
Let’s say you have team members Alice and Bob, and you run AWS services in two different AWS accounts called “webapp” and “analytics”.
Within your team, Alice fulfills the role of a full-stack developer for the web app, and she’s also a “serverless” developer for the computational parts of the analytics project. She thus needs full access to all resources and services within the “webapp” AWS account, and full access to AWS Lambda within the “analytics” account.
On the other hand, Bob’s area of responsibility is limited to full-stack development of the web app, thus he too needs full access to all resources and services within “webapp”, but no access to any resources within “analytics”.
Using the approach proposed here, Alice and Bob will be enabled to switch into specific roles – “LambdaManager” in “analytics” and “AccountManager” in “webapp” for Alice, and “AccountManager” in “webapp” for Bob.
The setup
Let’s now look at how this can be designed and implemented within AWS. The basic design can be visualized like this:

This diagram illustrates the following steps:
- You create a dedicated AWS “source” account where all your IAM users live, typically called “users”
- Within this “users” account, you create one IAM user for each team member
- For each role within a “target” account (like “LambdaManager” in target account “analytics”), you create one IAM policy within the “users” account – this policy is what allows IAM users to make a role switch into another AWS account
- You then map these IAM policies to your IAM users as required – in our example, IAM user “Alice” needs to be mapped to the policy for role “LambdaManager” in account “analytics” and to the policy for role “AccountManager” in account “webapp”, while IAM user “Bob” only needs to be mapped to the policy for role “AccountManager” in account “webapp”
Everything created so far lives in the source account, the dedicated “users” account – now we need to create resources within our target accounts:
- Within each target account, you need to create the roles that are referenced within the IAM policies of the “source” account – e.g., role “LambdaManager” in target account “analytics”
- For each role, you configure the source account as a “Trusted Entity”
- Each role then needs to be mapped to one or more IAM policies – these define the actual access rights which an IAM user who switched into the role gains within the target account
Here is how this setup would look like in the context of our example, for user Alice:

Note how this is a two-way construct: The IAM policy in the source account allows the IAM users to leave their own account and assume a role in the target account – this opens a door out of the source account, so to speak.
On the other side, the Trusted Entities entry on the role in the target account allows incoming assume-role requests from the source account and thus allows users to enter the account – it opens a door into the target account, so to speak.
Both measures together create a bridge between IAM users in one account and IAM roles in another account.
Code samples and screenshots
Let’s finish with some code and AWS Console examples.
This is an IAM policy within the source “users” AWS account – it allows users mapped to this policy to assume role “AccountManager” in target account 456 (“webapp”):
{
    "Version": "2012-10-17",
    "Statement": [
        {
            "Effect": "Allow",
            "Action": "sts:AssumeRole",
            "Resource": "arn:aws:iam::456:role/AccountManager"
        }
    ]
}
And here is the policy which allows users mapped to it to assume role “LambdaManager” in target account 789 (“analytics”):
{
    "Version": "2012-10-17",
    "Statement": [
        {
            "Effect": "Allow",
            "Action": "sts:AssumeRole",
            "Resource": "arn:aws:iam::789:role/LambdaManager"
        }
    ]
}
On the web console, the trust relationship between a role in a target account and the source account is shown as follows:
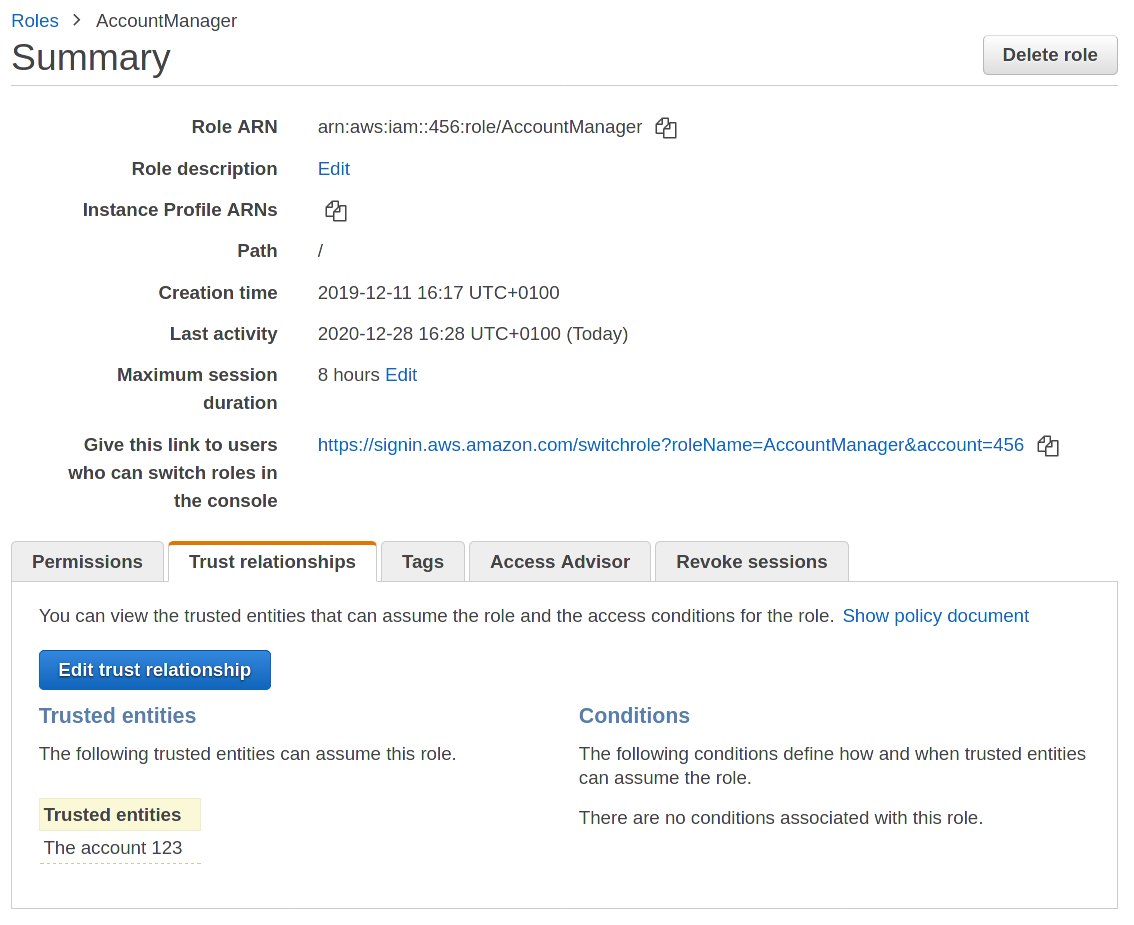
This shows role “AccountManager” in target account 456 (“webapp”).
Under the hood, a trust relationship is defined as an inline policy – it can be viewed by clicking on “Show policy document”, and looks like this:
{
  "Version": "2012-10-17",
  "Statement": [
    {
      "Effect": "Allow",
      "Principal": {
        "AWS": "arn:aws:iam::123:root"
      },
      "Action": "sts:AssumeRole"
    }
  ]
}
As expected, it defines AWS account 123 (“users”) as a trusted entity from which incoming “STS AssumeRole” requests shall be allowed.
The screenshot shows how the Web Console also offers a role-switch URL of the form https://signin.aws.amazon.com/switchrole?roleName=AccountManager&account=456 – after logging into their IAM users in AWS account “users”, Alice and Bob can use this link to switch into role “AccountManager” in target account 456 (“webapp”).
Conclusion
With this setup, we achieve a cleanly designed solution that can be managed and extended easily. Resources and services are strictly separated from each other. Each team member has only one user account, providing a single sign-on solution. Access rights are bound to roles, which users assume according to the task at hand – no need to move around within AWS with higher privileges than currently necessary.